Materials
Approx. 2’x3’x4’ block of high-density polyisocyanurate foam
Foam cutting and shaping tools (saws and belt sanders worked well for rough cutting)
Approx. 8 sq. yds. of 3K twill carbon fiber cloth
US Composites 635 Medium Cure Epoxy Resin
Perforated Release Film
Breather Cloth
Vacuum Bag
Air Compressor
Mixing containers, tongue depressors, and squeegees
Design Approach
Our design had to be under 7.5 lbs and able to support the weight and dynamic loading of a 200 lb driver during operation. We chose a full bucket seat over other designs because of simplicity and ease of manufacturing. Our seat would consist of a foam core wrapped in multiple layers of carbon fiber. A solid model was created in ABAQUS, a finite element analysis program, to determine the number of layers and fiber orientations needed for the composite seat. Our calculations showed that two layers around the whole seat would be sufficient in supporting the loads of the vehicle and driver during operation. It was also not necessary for us to orient the fibers in any other direction besides 0,90. In order to ease the manufacturing, we decided to layup two back layers first and allow it to fully cure before laying up the front two layers.
123,123
Procedure
Step 1: Cut Foam To Size
Our foam actually came in a large 2’x’4’x8’ block that needed to be trimmed to size. We cut off a large enough section for our seat and in order to conserve the expensive foam, we cut enough off for the back profile of the seat and then used some spray-on adhesive to glue a smaller piece at the bottom where the seat was going to go. If enough foam is available, this does not need to be done and the foam can be cut from one large block. Rough cuts to the angles were made using hand saws.
Step 2: Shaping The Foam
There were design constraints for our seat that limited the angles that the seat could rest at. This is why the seat is reclined back as far as it is. The seat contours were determined primarily by what was most comfortable. Rough shaping was done with a belt sander, allowing material to be quickly removed (and also made for a big mess). We used a shop vacuum in conjunction with the belt sander to avoid foam dust from flying everywhere. Small foam shaping files were used to detail the contours. We found and eliminated pressure points in the seat simply by sitting in it, sanding it down further, and repeating. This went on until all five members of the team deemed the seat comfortable. We had to constantly check for symmetry, which we did by lining the seat up against a wall with grid-like lines.
本文來自123
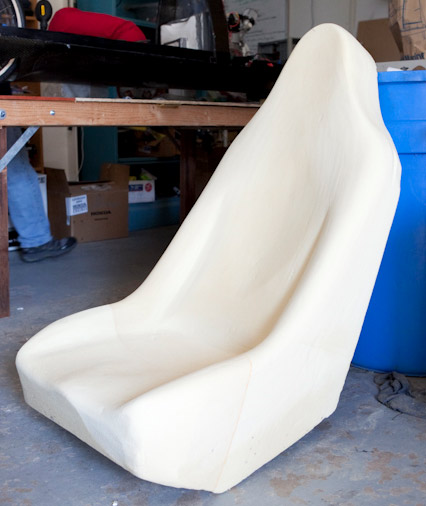
As shown in Figure 2, the seat top was shaped first, leaving a flat surface on the bottom that aided in creating a symmetrical and properly dimensioned seat. After the seat top was fully shaped, the bottom half was rounded out. We left a flat surface on the bottom for our seat bracket (not completed) to post-bond to.
Step 3: Cutting The Carbon Fiber Cloth
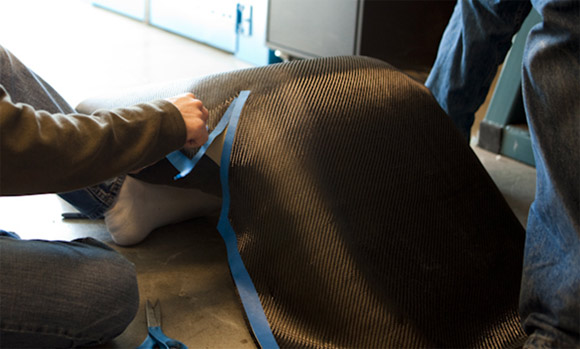
Dry carbon fiber frays easily when cut. This can lead to gaps forming in the weave and an ugly part. We attempted to minimize this by placing tape on the cloth and cutting along the tape lines. While it aided in cutting the cloth without fraying, it becomes necessary to remove the tape during the layup process. At first, we used painter’s blue masking tape, Figure 3, but this frayed the edges when the tape was removed. We also tried using transparent Scotch tape, which worked much better, but made it difficult to drape the cloth properly over the contours of the seat. The carbon was cut to size, two back layers and two front layers, while still dry and the tape left on so that it would not fray while impregnating the resin.
內容來自123456
 Step 4: Preparing The Vacuum Bag
The bag was cut to size by placing the seat inside and allowing extra space for the bag to conform to the seat shape. By sealing off three sides of the vacuum bag and leaving one side open, we decreased the time needed to fully seal the bag later.
Step 5: Impregnating The Resin
For the medium cure epoxy selected, pot life ranged from 20-25 minutes. This was not much time to get all laminate layers wet and laid on our foam plug. The back layers were wetted first. We decided the best way to wet the layers was to lay both cloth layers inside an oversized vacuum bag and to place resin in between the layers inside the bag. Then the resin was spread throughout the cloth from the outside of the vacuum bag using the plastic squeegee. Once the cloth was fully wetted, it was immediately removed from the bag and placed on the foam.
123456
Step 6: Placing Cloth On Foam
Despite having pre-cut the cloth, after wetting, the cloth stretched slightly, necessitating further cuts in order for it to drape properly. To our surprise, the scotch tape was much easier to remove with the cloth wetted, leaving little fraying compared to removing the tape while dry. The layer with masking tape did not perform similarly, so that layer was placed on first, tape side down. We left the tape in since it would not affect the performance or the appearance of the inner layer. The ends that draped over the edges were taped to the front side of the seat. These edges would be trimmed later so we did not mind placing extra tape on them to secure the back layers firmly to the foam.
Step 7: Applying Peel Ply and Breather Cloth
The peel ply does not drape well, so we had to make many cuts in the material in order to get it to fold over the contours well. Because the peel ply is removed later, pieces can be cut as much as necessary without affecting the layup. By this time, we were well past the 20-25 minute pot life of the resin, so the resin began getting tackier. This allowed us to easily stick small pieces of peel ply around the complex curves. At least one layer of breather cloth was placed over the peel ply.
123,123
Step 8: Applying The Vacuum
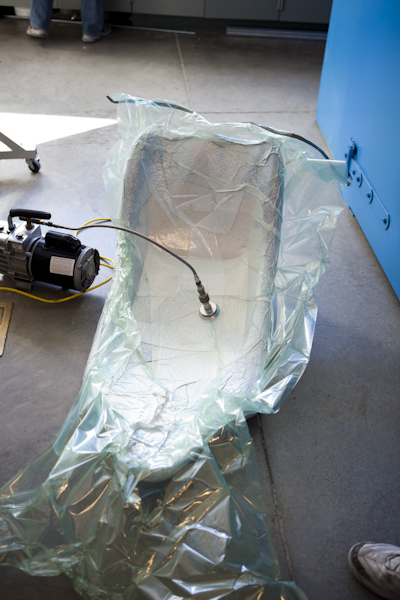
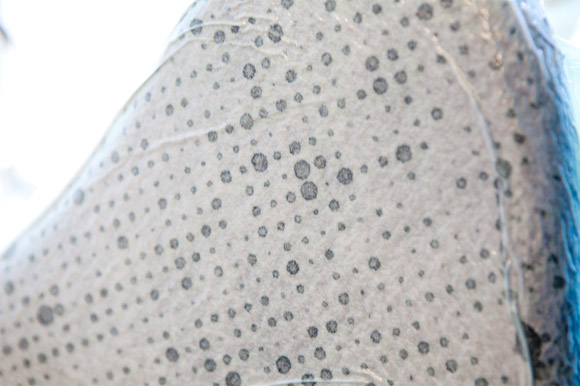
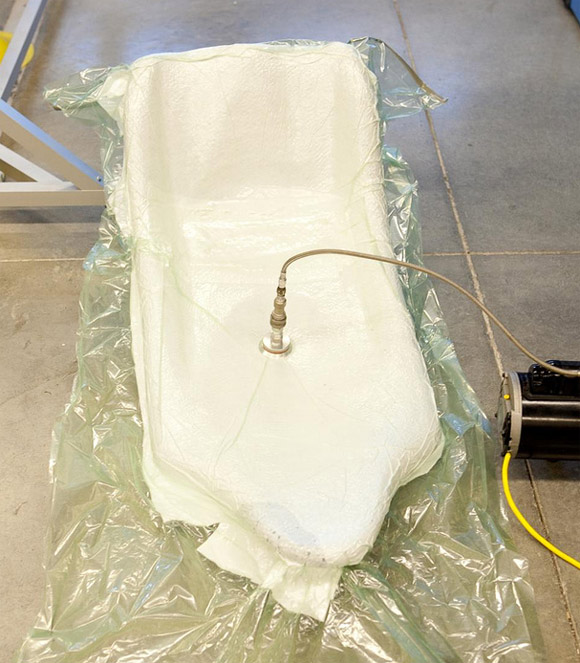
Because the bag is already prepared, the foam with wetted cloth, peel ply, and breather cloth can be placed directly into the bag and sealed quickly. Using a vacuum pump and valve, a vacuum was applied to the seat for about two hours. Figure 4 shows the part under the vacuum. Figure 5 shows how the perforated peel ply allowed extra resin to be absorbed by the breather cloth. This helped keep the seat weight to a minimum. Because the bag was sealed well, after removal of the vacuum, we experienced no problems with leaking.
 Step 9: Trimming the Extra Cloth
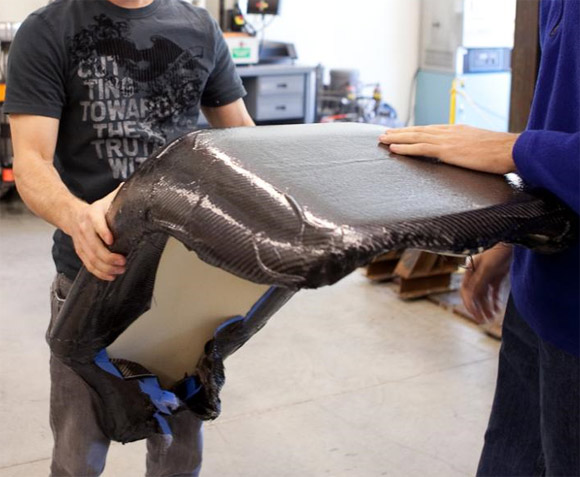
A couple days later, we returned to un-wrap the seat and trim the overhanging edges. Figure 6 shows the part right out of the vacuum bag. The vacuum bag was saved for use with the front layers. Using a box cutter, the extra carbon was easily trimmed off.
 本文來自123
Step 10: Front Layers
本文來自123
Step 10: Front Layers
For the front layers, steps 5 through 8 were repeated in a similar fashion. In order to keep the cloth adhered to the inner curvature of the seat, we tried stapling it to the foam. This worked to some degree, but in the end, we removed the staple in order to allow the cloth to shift during vacuum bagging. The carbon had to be trimmed more carefully prior to curing since we would not have the luxury of cutting into the bottom layers in order to remove loose ends on the top layers. Accidentally cutting into the back layers would also be detrimental to the strength of the part. We placed extra breather cloth, rolled into a tube, right at the back bottom of the seat in order to increase the pressure to the carbon there during curing and to minimize pleating. Figure 7 shows the front layers under vacuum.
In hind sight, we should have placed more layers of breather cloth under the vacuum valve, as the valve left a distinct mark on the part’s surface despite the two layers of breather cloth already there.
內容來自123456
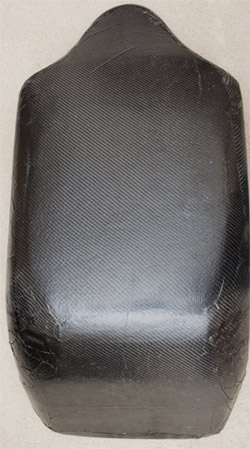
Final Part
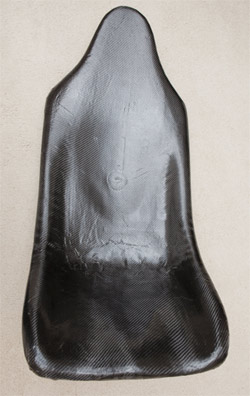
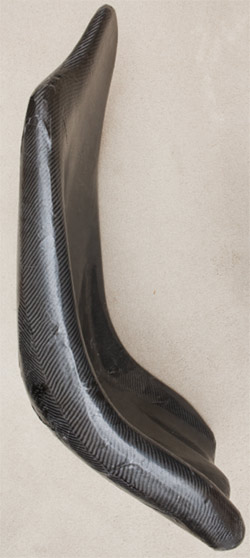
Figure 8 shows, from left to right, the seat’s front, side, and back as it stands. We noticed some marks on the front that appeared to be pleats, but these are just resin bubbles that will be sanded off. Prior to attaching the bracket, we plan to completely sand down the seat and apply a clear coat to it.


 潤大世紀為您提供高品質的碳纖維及凱夫拉成型產品!


